If you’ve never tried hasselback chicken recipes, you are seriously missing out. This dish looks impressive, tastes incredible, and it’s surprisingly simple to make at home. Whether you’re cooking for your family on a Tuesday night or hosting friends on the weekend, this recipe always gets compliments.
The best part? You don’t need any fancy skills. Just a sharp knife, a few good ingredients, and about 30 minutes of your time. Let’s dive in.
What Is Hasselback Chicken?
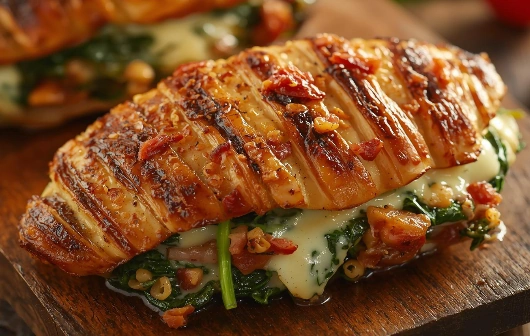
The name might sound a little mysterious, but the idea is straightforward. Hasselback chicken is a regular chicken breast that you cut into slits — not all the way through — and then stuff those slits with delicious fillings like cheese, vegetables, or herbs. The result is a juicy, flavorful chicken breast that looks beautiful on the plate.
The Swedish Origin of the Hasselback Technique
The hasselback technique actually started with potatoes, not chicken. It was invented at the Hasselbacken restaurant in Stockholm, Sweden, back in the 1950s. Chefs would slice potatoes thinly, fan them open, and roast them until crispy. The idea spread across the world and eventually made its way into chicken recipes. Smart move, honestly.
Why This Method Works Perfectly With Chicken Breasts
Chicken breasts can dry out easily if you’re not careful. But the hasselback method changes that completely. When you slice the chicken and pack the slits with cheese and vegetables, the moisture stays locked inside during baking. The cheese melts into every layer, keeping the meat tender and juicy. It’s basically a built-in basting system.
Common Fillings Used in Hasselback Chicken Recipes
The options are almost endless. Here are some popular choices:
- Mozzarella and fresh basil
- Cheddar and jalapeños
- Cream cheese and spinach
- Sun-dried tomatoes and parmesan
- Bacon and ranch seasoning
- Brie and mushrooms
You can mix and match depending on what’s in your fridge. That’s what makes this dish so fun.
Ingredients Needed for the Best Hasselback Chicken Recipes
Before you start cooking, let’s make sure you have everything ready. Good ingredients make a huge difference.
Choosing the Right Chicken Breasts
Go for large, evenly sized chicken breasts. They need to be thick enough so you can cut slits without going all the way through. Thin chicken breasts are harder to work with and tend to dry out faster. Boneless and skinless works best for this recipe. Fresh chicken is ideal, but thawed frozen chicken works fine too.
Best Cheese Options for Melting
Not all cheese melts the same way. For hasselback chicken, you want a cheese that gets gooey and stretchy when it bakes. Here are the top choices:
- Mozzarella (classic, mild, melts beautifully)
- Provolone (slightly sharper, great with herbs)
- Cheddar (bold flavor, good for bolder fillings)
- Gouda (creamy and rich)
- Pepper Jack (adds a little heat)
Avoid hard cheeses like parmesan alone — they don’t melt well. But you can mix them in for extra flavor.
Vegetables and Herbs That Add Flavor
Fresh vegetables and herbs take this dish to the next level. Some great options include:
- Baby spinach (wilts perfectly inside the slits)
- Sun-dried tomatoes (intense, sweet flavor)
- Fresh basil leaves
- Thin slices of bell pepper
- Roasted garlic
- Sliced mushrooms
Keep your vegetables thin. Thick pieces won’t fit easily into the slits.
Seasonings That Improve Taste Instantly
Don’t skip the seasoning. A well-seasoned chicken breast is the difference between good and amazing. Use:
- Garlic powder
- Onion powder
- Smoked paprika
- Italian seasoning
- Salt and black pepper
- A drizzle of olive oil
Rub the seasoning all over the outside of the chicken before baking. This creates a flavorful crust.
How to Cut Chicken Hasselback Style
The cut is the most important step. Get this right, and the rest is easy.
Easy Knife Technique for Even Slices
Place your chicken breast flat on a cutting board. Use a sharp chef’s knife. Start cutting slits across the width of the breast, about 1 centimeter apart. Angle your cuts slightly, going about three-quarters of the way down. Do NOT cut all the way through — the bottom should stay connected. You want the breast to fan open slightly, like accordion folds.
A helpful trick: place a wooden spoon or chopstick on each side of the chicken. This acts as a guide so you don’t accidentally cut too deep.
Mistakes That Dry Out Chicken
Here’s what to watch out for:
- Cutting too deep (you’ll lose the structure)
- Not patting the chicken dry before seasoning
- Overbaking (always use a meat thermometer)
- Skipping the olive oil rub
- Using very thin chicken breasts
Take your time with the cutting step. It’s worth it.
Pro Tip for Stuffing the Slits Easily
Gently fan open each slit with your fingers before stuffing. This makes it much easier to slide in cheese slices or small handfuls of vegetables. Don’t overstuff — a little goes a long way. You want the slits to close back up slightly so everything stays inside during baking.
Classic Cheesy Hasselback Chicken Recipe
This is the recipe I come back to again and again. It’s simple, cheesy, and absolutely delicious.
My learning moment: The first time I made this, I completely cut through two of the slits. The cheese fell out all over the baking dish. It was a little chaotic — but honestly, even then it tasted great. Now I use a chopstick as a cutting guide every single time, and it works perfectly.
Step-by-Step Preparation
You’ll need:
- 4 large chicken breasts
- 8 slices of mozzarella cheese
- 1 cup baby spinach
- 2 tablespoons olive oil
- 1 teaspoon garlic powder
- 1 teaspoon smoked paprika
- 1 teaspoon Italian seasoning
- Salt and pepper to taste
Step 1: Preheat your oven to 400°F (200°C). Step 2: Pat the chicken breasts dry with paper towels. Step 3: Cut slits across each breast, about 1 cm apart and three-quarters deep. Step 4: Rub each breast with olive oil, garlic powder, paprika, Italian seasoning, salt, and pepper. Step 5: Stuff each slit with a small piece of mozzarella and a few spinach leaves. Step 6: Place the chicken in a greased baking dish. Step 7: Bake uncovered for 25 to 30 minutes. Step 8: Let it rest for 5 minutes before serving.
Baking Time and Temperature
Always bake at 400°F (200°C). This temperature is hot enough to melt the cheese fully and create a golden crust, but not so hot that the chicken dries out. For thicker breasts, add 5 to 10 extra minutes. For thinner ones, start checking at the 20-minute mark.
How to Know When Chicken Is Fully Cooked
The safest way is to use a meat thermometer. Insert it into the thickest part of the breast. You’re looking for an internal temperature of 165°F (74°C). If you don’t have a thermometer, cut into the thickest part. The juices should run clear, and the meat should no longer look pink.
Related articles:
- Baked Chicken Recipes with Mayo: Crispy, Juicy & Easy Family Dinners
- Applebee’s Honey Pepper Chicken Recipe: Make It at Home Tonight
- The Best Meal Prep Chicken Recipe You’ll Actually Want to Eat All Week
Popular Hasselback Chicken Recipe Variations
Once you’ve mastered the classic version, try these fun twists. Each one brings something totally different to the table.
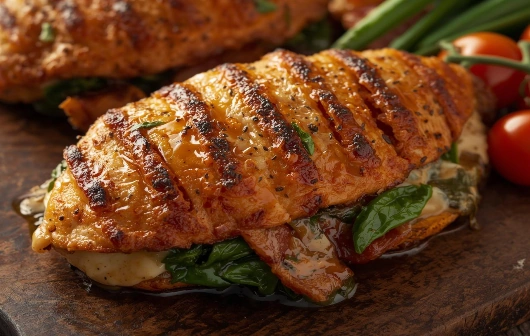
Spinach and Mozzarella Hasselback Chicken
This is the most popular variation. Layer baby spinach with mozzarella slices in each slit. Add a little cream cheese for extra richness. It’s creamy, fresh, and satisfying. Great for meal prep too.
Bacon Ranch Hasselback Chicken
Stuff each slit with cheddar cheese and crispy bacon bits. Mix ranch seasoning into softened cream cheese and spread it over the outside of the chicken before baking. This one is a serious crowd-pleaser.
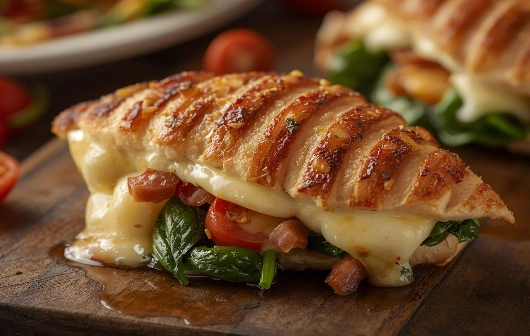
Caprese Hasselback Chicken
Go Italian with this beautiful option. Alternate slices of fresh mozzarella and thin tomato slices in the slits. Add fresh basil leaves. Drizzle with balsamic glaze right before serving. It looks stunning and tastes even better.
Jalapeño Popper Hasselback Chicken
Love heat? Fill each slit with cream cheese, cheddar, and thin jalapeño slices. Top with a little crumbled bacon. This one tastes exactly like a jalapeño popper — but in chicken form. It’s addictive.
Keto Hasselback Chicken Recipes
Great news for anyone eating low-carb: hasselback chicken is naturally keto-friendly. Just skip any breadcrumb topping and focus on cheese, spinach, bacon, and cream cheese as your fillings. Pair it with cauliflower rice or roasted vegetables for a complete keto meal. These keto hasselback chicken recipes are some of the easiest high-protein meals you can make.
What to Serve With Hasselback Chicken
The chicken is the star, but good sides make the meal complete.
Best Side Dishes
- Garlic mashed potatoes
- Roasted asparagus
- Steamed broccoli
- Rice pilaf
- Crusty bread (to soak up the cheesy juices)
- A simple green salad
Low-Carb Pairing Ideas
Going low-carb? Try these:
- Zucchini noodles with olive oil and garlic
- Cauliflower mash
- Roasted Brussels sprouts
- Sautéed green beans
- Caesar salad (no croutons)
Sauces That Match Perfectly
A good sauce can elevate the whole dish. Try:
- Marinara sauce (classic Italian pairing)
- Garlic butter drizzle
- Balsamic glaze
- Creamy pesto sauce
- Honey mustard (great with bacon versions)
Storage and Reheating Tips
Made too much? No problem. This dish stores and reheats really well.
How to Store Leftovers Properly
Let the chicken cool completely before storing. Place it in an airtight container and refrigerate for up to 3 days. Keep the chicken whole if possible — it stays moister that way.
Best Way to Reheat Without Drying
The oven is your best friend here. Place the chicken in a baking dish, add a splash of water or chicken broth, cover with foil, and heat at 325°F (165°C) for about 15 minutes. This keeps the chicken moist. The microwave works too, but use a damp paper towel over the chicken and heat in short 30-second bursts.
Can You Freeze Hasselback Chicken?
Yes, you can. Wrap each cooked breast tightly in plastic wrap, then place in a freezer bag. It keeps well for up to 2 months. Thaw overnight in the fridge before reheating. Note that the cheese texture may change slightly after freezing, but the flavor stays great.
Frequently Asked Questions
Can I use chicken thighs instead?
Absolutely. Boneless, skinless chicken thighs work well with the hasselback method. They’re slightly fattier, which actually makes them even juicier. The slits won’t be as clean since thighs are less uniform in shape, but the result is still delicious. Adjust your baking time — thighs may need a few extra minutes.
How deep should the cuts be?
Aim for about three-quarters of the way through the breast. This gives you deep enough pockets to stuff with fillings, while keeping the chicken intact so it holds its shape during baking. Going deeper than three-quarters risks the breast splitting open or losing structure.
Can I prepare hasselback chicken ahead of time?
Yes, and it’s a great time-saver. You can cut, season, and stuff the chicken up to 24 hours ahead. Cover it tightly with plastic wrap and refrigerate. When you’re ready to cook, just take it out 10 minutes before baking and pop it straight into the oven. Meal prep just got a lot easier.
What cheese melts best in hasselback chicken recipes?
Mozzarella is the top choice for hasselback chicken recipes because it melts smoothly and has a mild flavor that works with almost any filling. Provolone and Gouda are excellent runner-ups. For a bolder flavor, try a mix of mozzarella and cheddar. Avoid feta or hard aged cheeses as the main filling — they don’t melt the same way.
Is hasselback chicken difficult for beginners?
Not at all. The cutting step feels a little intimidating the first time, but after one or two tries, it becomes second nature. The rest of the recipe is straightforward. If you can season chicken and use an oven, you can absolutely make this dish.
Conclusion
Hasselback chicken is one of those recipes that looks fancy but is genuinely easy to pull off. Pick your favorite fillings, make those slits, and bake until golden and bubbly. Your next step: preheat your oven tonight and try the classic cheesy version — you’ll be making it on repeat.