If you have ever Googled ‘perfect roast chicken,’ you have probably stumbled upon the Martha Stewart roasted chicken recipe at least once. And honestly? That makes total sense. This recipe has been around since 1997, and home cooks still reach for it every single week. But here is the thing — most people are missing a few small steps that make a huge difference. So today, we are breaking it all down. From the prep work to the pan sauce, you will know exactly how to nail this dish the first time.
Whether you are cooking for a weeknight dinner or hosting guests, this recipe delivers every time. It is simple, it is satisfying, and it is rooted in real cooking wisdom. Let’s get into it.
What Makes Martha Stewart’s Roasted Chicken Recipe So Special?
At first glance, roasted chicken sounds easy. You season a bird, throw it in the oven, and wait. But anyone who has done this knows the truth — dry meat, pale skin, and a bland result are all too common. Martha’s recipe sidesteps every one of those pitfalls with a few smart techniques. Here is why this recipe has earned its legendary status.
The Story Behind the Recipe: From 1997 to Her Las Vegas Restaurant
The recipe first appeared in the September 1997 issue of Martha Stewart Living magazine. Back then, it was a quiet sensation. Over the decades, it became her go-to roast chicken — the one she returns to again and again. It has since traveled from the pages of her magazine all the way to her Las Vegas restaurant, where it still appears on the menu in an elevated form.
That kind of staying power is rare. It tells you this is not just a recipe — it is a method. And methods, when they are sound, last forever.
The Philosophy: Only 8 Ingredients, Zero Compromise
Martha’s roasted chicken recipe uses just eight ingredients: a whole chicken, butter, salt and pepper, onions, lemons, garlic, fresh thyme, and chicken stock. That is it. No elaborate spice rub. No complicated marinade. Each ingredient has a precise job, and together they produce something that feels far more complex than the sum of its parts.
The lemon perfumes the meat from the inside out. The thyme adds an earthy, herbal note. The butter bastes and browns. It is minimalism done right.
Why Quality Ingredients Are Non-Negotiable
Martha herself has said it plainly: ‘the chicken is a very good chicken.’ She sources from premium organic suppliers and insists on locally grown fresh herbs. This is not snobbery — it is good cooking logic. A better bird has more flavor, better texture, and responds beautifully to high heat.
If you can, choose an air-chilled organic chicken. It will have drier skin out of the package, which matters a lot (more on that in a second). And always use fresh thyme, not dried. The difference is real.
You might like:
- Chinese Soup Chicken Recipe: The Complete Guide to 4 Classic Styles
- Cream of Celery Soup : Easy, Creamy, and Comforting Dinner
- Moe’s Adobo Chicken Recipe: The Best Copycat You’ll Ever Make at Home
The Real Secrets Behind the Crispy Skin (What Most Recipes Don’t Tell You)
Crispy skin is the holy grail of roast chicken. Yet so many home cooks end up with pale, rubbery skin that slides right off. The good news? Getting it right comes down to a few steps that most recipes gloss over.
Martha’s #1 Rule: Dry Your Chicken (The Step Everyone Skips)
This is the most important step, and it is the one most people skip. Before roasting, you need to pat the chicken completely dry with paper towels. Martha herself has been very clear about this in interviews: ‘It makes a huge difference,’ she says.
But drying it right before cooking is only the start. For best results, leave the chicken uncovered in the refrigerator overnight. This allows the surface moisture to evaporate slowly and deeply, setting you up for maximum crunch when it hits the hot oven.
I learned this the hard way on a Sunday dinner years ago. I skipped the overnight dry and the skin came out soft and almost steamed. Since then, I prep my chicken the night before every single time — and the difference is night and day.
The Baking Powder Hack for Ultra-Crispy Skin (Added Value)
This trick is not in Martha’s original recipe, but it is worth knowing. Mix a small amount of baking powder with your salt and rub it into the skin before refrigerating. The baking powder draws out moisture and, because it is alkaline, it also speeds up the Maillard reaction — the chemical process that gives you that deep golden-brown color and irresistible crunch.
Use about one teaspoon of baking powder for every tablespoon of salt. Rub it all over the skin and leave it uncovered in the fridge for at least two hours, or overnight.
Butter vs. Oil: Which Fat Actually Wins?
Martha uses butter, and for good reason. Butter adds a rich, nutty flavor and helps with browning. It also melts into the skin as the chicken roasts, basting the bird from the outside.
However, if maximum crispiness is your single biggest goal, consider swapping the butter for vegetable oil or avocado oil. Oil has a higher smoke point and zero water content, which means it does not steam the skin at all. The result is thinner, crispier skin with less flavor complexity. So it depends on what you are after:
- Butter: better flavor, beautiful color, slightly softer texture
- Oil: crispier texture, more neutral flavor, easier to achieve at home
- Combination: brush oil first, finish with a small butter pat — best of both worlds
Step-by-Step Guide to the Martha Stewart Roasted Chicken Recipe
Ready to cook? Here is the full process, explained clearly so that even first-time roasters can follow along with confidence.
Preparing the Bird: Trussing, Stuffing, and Seasoning
Start with a 4 to 5-pound whole chicken, patted very dry. Season generously inside and out with salt and black pepper. Then stuff the cavity with halved lemons, a few smashed garlic cloves, and several sprigs of fresh thyme.
Before adding the lemon, roll it back and forth firmly under the palm of your hand on the counter. This softens the lemon and breaks down its membranes, allowing the juice to flow more freely inside the bird while it roasts. It is a tiny step with a big payoff.
Trussing — tying the legs together with kitchen twine — helps the bird cook more evenly and keeps its shape. If you do not have twine, you can skip this step, but the presentation will be less tidy.
Finally, rub the exterior all over with softened butter or oil. Place sliced onions and a halved head of garlic in the bottom of a roasting pan to elevate the chicken and add flavor to the drippings.
Roasting at the Right Temperature: The Fast and High Method
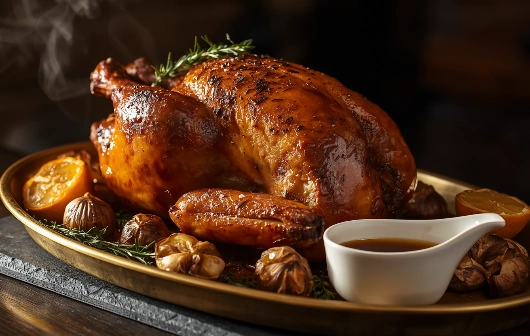
Preheat your oven to 450°F (230°C). Yes, that sounds high — and it is. This is the ‘fast and high’ method that Martha champions, and it is the key to crispy skin and juicy meat without spending hours in the kitchen.
Roast a 4 to 5-pound chicken for about 50 to 55 minutes. The high heat caramelizes the skin quickly and seals in the juices. You end up with a lemony, golden-brown bird with a beautiful char on the outside and tender, moist meat inside.
Do not open the oven door repeatedly during roasting. Every time you open it, the temperature drops and you lose momentum on the browning.
The Internal Temperature Trick: Pull It Earlier Than You Think
Most recipes tell you to cook chicken to 165°F. Martha’s advice is smarter: remove the chicken when the thickest part of the thigh reads 160°F. As the bird rests on the counter, carry-over cooking will bring it up to the safe 165°F on its own.
This matters because those last five degrees inside the oven are what dry out the breast meat. Pulling it early and letting it coast to temperature produces noticeably juicier results. Use an instant-read thermometer inserted into the thigh (avoiding the bone) to check.
How to Rest the Chicken Properly: 10 to 15 Minutes Is Not Optional
Once the chicken comes out of the oven, resist every urge to carve it immediately. Place it on a cutting board or serving platter and tent it loosely with aluminum foil. Let it rest for a minimum of 10 minutes — 15 is better.
During this rest, the juices that have been pushed to the center of the meat redistribute throughout the bird. If you cut into it too early, those juices spill out onto the cutting board instead of staying in the meat where they belong.
Resting is not a suggestion. It is the difference between a juicy chicken and a dry one.
The Pan Sauce: Martha’s Secret Weapon
Once the chicken is resting, do not walk away from that roasting pan. Those browned bits and caramelized drippings at the bottom are pure gold. This is where the pan sauce happens, and it takes about five minutes.
How to Build a Rich, Glossy Gravy from the Drippings
Pour off most of the fat from the pan, leaving the drippings behind. Set the pan over medium-high heat on your stovetop. Add about a cup of chicken stock and use a wooden spoon to scrape up all the browned bits from the bottom — this is called deglazing, and it is where all the flavor lives.
Let the sauce reduce by about half, then strain it into a small saucepan. Over low heat, stir in a cold tablespoon of butter until it melts and the sauce turns glossy. Taste and season with salt and pepper. That is your pan sauce — simple, rich, and deeply savory.
White Wine Variation for a Restaurant-Level Pan Sauce
For a more complex, dinner-party-worthy sauce, swap the chicken stock for a dry white wine during the deglazing step. The wine adds acidity and depth that plain stock cannot match. Use a wine you would actually drink — nothing labeled ‘cooking wine.’
After the wine reduces and the alcohol burns off, add a splash of stock to round it out. Finish with that cold butter pat, and you have a sauce that tastes like it came from a proper restaurant kitchen. Your guests will ask how you did it.
Martha Stewart vs. Julia Child: Who Wins?
If you spend any time in roast chicken territory, you will inevitably run into Julia Child’s version. Both are beloved, both are delicious, and both have loyal followings. But they are quite different recipes. Here is a quick comparison.
Key Differences in Technique and Prep Time
Julia Child’s roast chicken method is more involved. She often recommends starting the chicken on its side, then flipping it during roasting to ensure even browning and basting. Her approach is hands-on and requires more active time in the kitchen. The results are extraordinary — but it demands attention and confidence.
Martha’s method, by contrast, is beautifully streamlined. Season the bird, stuff the cavity, butter the skin, and put it in a hot oven. You barely need to touch it after that. For a beginner or someone short on time, that simplicity is a real advantage.
Which Recipe Is Best for Weeknights vs. Special Occasions?
For weeknight dinners, Martha wins hands down. The prep is minimal, the cook time is under an hour, and the results are consistently delicious. You can have this on the table in about 70 minutes from start to finish.
For a special occasion when you want to impress and have time to invest, Julia’s more elaborate method is worth the effort. But for reliable, weekly roast chicken that delivers spectacular results every time, the Martha Stewart roasted chicken recipe is the right call.
Variations and Modern Upgrades to Martha’s Classic
The base recipe is perfect as written — but it is also a fantastic canvas for creative riffs. Here are three ways to build on it without breaking what makes it great.
One-Pan Version with Roasted Vegetables: Cauliflower and Sweet Potatoes
To turn this into a complete one-pan meal, scatter chunked sweet potatoes and cauliflower florets around the chicken before it goes into the oven. Toss them in a bit of olive oil, salt, and pepper first. They will roast in the chicken drippings and absorb all that lemony, herby flavor.
You might need to add five to ten minutes to the total cook time depending on how large the vegetable pieces are. Check the internal temperature of the chicken as always, not the clock.
Herb Under the Skin Upgrade: The Restaurant Move
At her restaurant, Martha takes the recipe a step further by inserting a flavorful herbed breadcrumb stuffing directly under the skin. She also places whole sprigs of rosemary inside the cavity alongside the lemon and thyme.
You can recreate this at home by gently loosening the skin over the breast with your fingers and spreading a mixture of softened butter, minced garlic, fresh thyme, and parsley directly onto the meat. The herbs and fat sitting right against the meat create a layered, deeply savory flavor that the base recipe hints at but this version delivers fully.
Make It Global: French, Mediterranean, and Moroccan Twists
The base recipe accepts global flavors beautifully. Try these variations:
- French: Swap thyme for tarragon, add a splash of Dijon mustard under the skin, and deglaze with white wine and a touch of cream for a classic French pan sauce.
- Mediterranean: Rub the skin with za’atar and olive oil, stuff with preserved lemon and olives, and roast on a bed of cherry tomatoes.
- Moroccan: Season with ras el hanout, cumin, and cinnamon, stuff with dried apricots and onions, and finish with a drizzle of honey and fresh cilantro.
In each case, the underlying technique stays the same. It is Martha’s method doing the heavy lifting — the flavors just change the destination.
Common Mistakes to Avoid When Making This Recipe
Even a great recipe can go sideways if you fall into a few common traps. Here are the most frequent mistakes and how to avoid each one.
Skipping the Rest: The Number One Juiciness Killer
We covered this above, but it is worth repeating because it is the single most common mistake. Cutting into the chicken right out of the oven pushes all the internal juices out onto the board. Give the bird at least 10 minutes of rest time, covered loosely with foil. This step costs nothing and pays off enormously.
Overcrowding the Pan
If you pack the roasting pan with too many vegetables or crowd the chicken into a pan that is too small, two bad things happen. First, the chicken steams instead of roasting because the moisture cannot escape. Second, the drippings burn instead of caramelizing. Use a pan with enough room for air to circulate freely around the bird.
Not Basting — Or Basting Too Much
Martha’s method does not require constant basting. Opening the oven every 15 minutes to spoon juices over the chicken actually hurts more than it helps — each time you open the oven, the temperature drops, extending the cooking time and ruining the skin’s crisping progress.
If you want to baste, do it once, quickly, at the halfway point. Otherwise, trust the high heat and the butter already on the skin to do their jobs. The oven is not a crock pot — leave it alone and let it work.
FAQs About Martha Stewart Roasted Chicken Recipe
What temperature does Martha Stewart roast chicken at?
Martha roasts her chicken at 450°F (230°C). This high heat is intentional — it is the engine behind the crispy skin and fast cook time. A lower temperature will give you softer skin and a longer wait.
How long does it take to roast a chicken using Martha’s method?
For a 4 to 5-pound chicken roasted at 450°F, expect about 50 to 55 minutes of oven time, plus 10 to 15 minutes of resting. Total time from prep to table is roughly 70 to 80 minutes.
Can I make the Martha Stewart roasted chicken recipe without trussing?
Yes, absolutely. Trussing helps the bird cook evenly and look prettier, but it is not essential. If you skip it, the legs may splay out and the thigh area can take a few extra minutes to come up to temperature. Just keep an eye on the thermometer and adjust accordingly.
What should I serve with Martha Stewart’s roasted chicken?
This chicken pairs beautifully with a wide range of sides:
- Classic mashed potatoes (they love the pan sauce)
- Roasted green beans or broccolini
- A simple green salad with lemon vinaigrette
- Crusty bread to soak up the drippings
- Roasted root vegetables if you want a heartier plate
How do I know when Martha Stewart’s roasted chicken is done?
The most reliable method is a meat thermometer. Insert it into the thickest part of the thigh, avoiding the bone. Remove the chicken at 160°F and let it rest — it will coast up to the safe 165°F on its own. Visual cues like clear running juices and golden skin are helpful but not as precise as a thermometer.
Can I prep the Martha Stewart roasted chicken recipe ahead of time?
Yes, and you should. Season and dry the chicken the night before, then leave it uncovered in the refrigerator. This step dramatically improves the skin texture. You can also prep the cavity stuffing ingredients in advance. When dinner time comes, you simply assemble, butter, and roast.
Final Thoughts
The Martha Stewart roasted chicken recipe has endured for nearly three decades for one simple reason: it works. It is built on honest technique, quality ingredients, and a clear respect for what a whole roasted chicken can be when treated well. The ‘fast and high’ method, the overnight dry, the simple pan sauce — none of this is complicated, but all of it matters.
If you have never made this recipe before, this weekend is your moment. Pick up a good chicken, grab fresh thyme, and give it an honest try. Once you taste the result — that golden skin, the lemony steam that rises when you carve it, the glossy pan sauce pooling on the plate — you will understand why home cooks keep coming back to this recipe, year after year.
Your action plan: dry the chicken tonight, roast it tomorrow at 450°F, rest it faithfully, and make the pan sauce while it waits — then sit down to the best roast chicken you have ever made at home.